


How to configure Apache Syncope to provision Users and Groups to Microsoft Azure AD
 We recently developed and released the Azure connector as part of the ConnId project. This bundle is used to connect the Microsoft Azure AD to Apache Syncope.
 The development of this connector's first stable version has been sponsored by iWelcome, the leading European IDaaS provider.
Here I'm going to show how to use it on Syncope 2.0.8.
First of all, you should follow the "Prerequisites" instructions on Azure connector wiki page on how to configure Azure AD.
Create project from maven archetype
The new connector is available by default from Syncope 2.0.9-SNAPSHOT, but in this guide I'll show you how to use it in our Syncope latest stable release (2.0.8); so let's start creating a simple Apache Syncope 2.0.8 project from archetype:
$ mvn archetype:generate \
-DarchetypeGroupId=org.apache.syncope \
-DarchetypeArtifactId=syncope-archetype \
-DarchetypeRepository=http://repo1.maven.org/maven2 \
-DarchetypeVersion=2.0.8
By default, the embedded mode is populated with example data.
In order to be more clear, I'll work on a fresh Syncope instance; so if you want to do the same, you can remove example data by running the following commands:
$ cd [CREATED_PROJECT_FOLDER]
$ cp core/src/main/resources/domains/MasterContent.xml core/src/test/resources/domains/MasterContent.xml
Add Azure connector dependency to Syncope bundles list
To add the Azure bundle dependency to 2.0.8 project you'll need to edit root "pom.xml" file and add the "net.tirasa.connid.bundles.azure" dependency.
So from project main folder, edit the pom.xml file by frist adding:
<properties>
  ...
  <connid.azure.version>1.0.0</connid.azure.version>
  ...
</properties>
then also adding the "maven-dependency-plugin" as you can see here and remember to insert that content under:
<pluginManagement>
  <plugins>
	...
  </plugins>
</pluginManagement>
Run Syncope in embedded mode
From the project root dir, run:
$ mvn -P all clean install && cd enduser && mvn -P embedded,all
Open http://localhost:9080/syncope-console and you'll access the Syncope Admin Console.
Login to Admin Console using the default "admin" / "password" credentials.
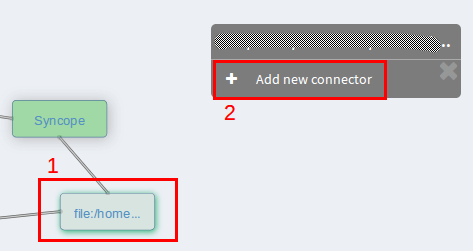
Set up an Azure external resource
Go to "Topology" and add a new connector (see image below):
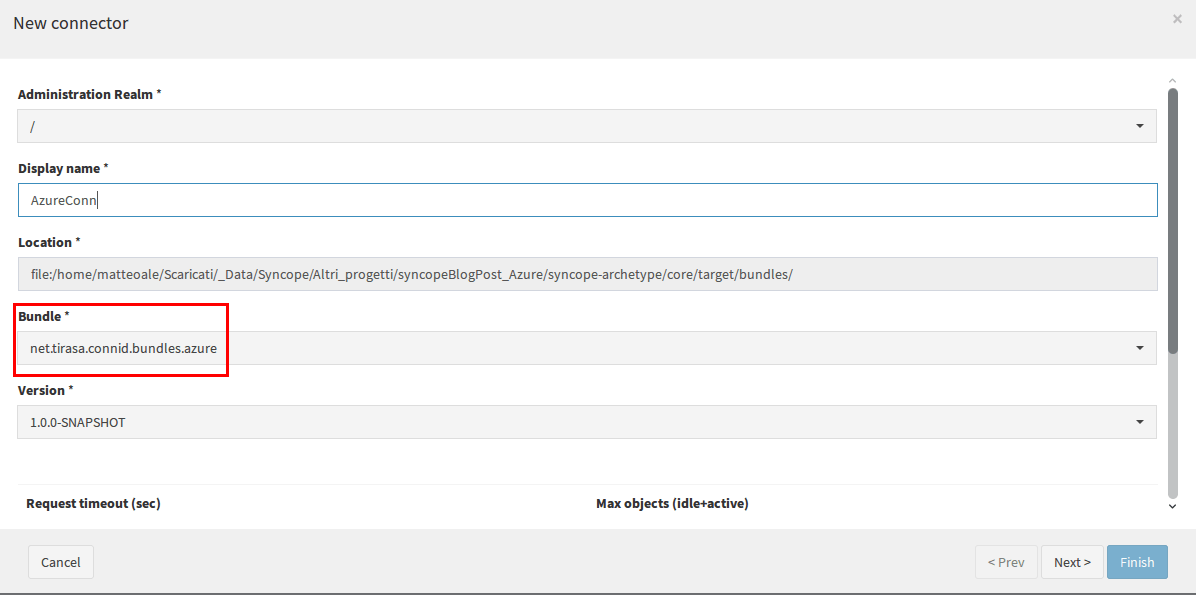
You'll be able to see the new Azure bundle, so choose "net.tirasa.connid.bundles.azure" from "Bundle" list and fill the other required fields:
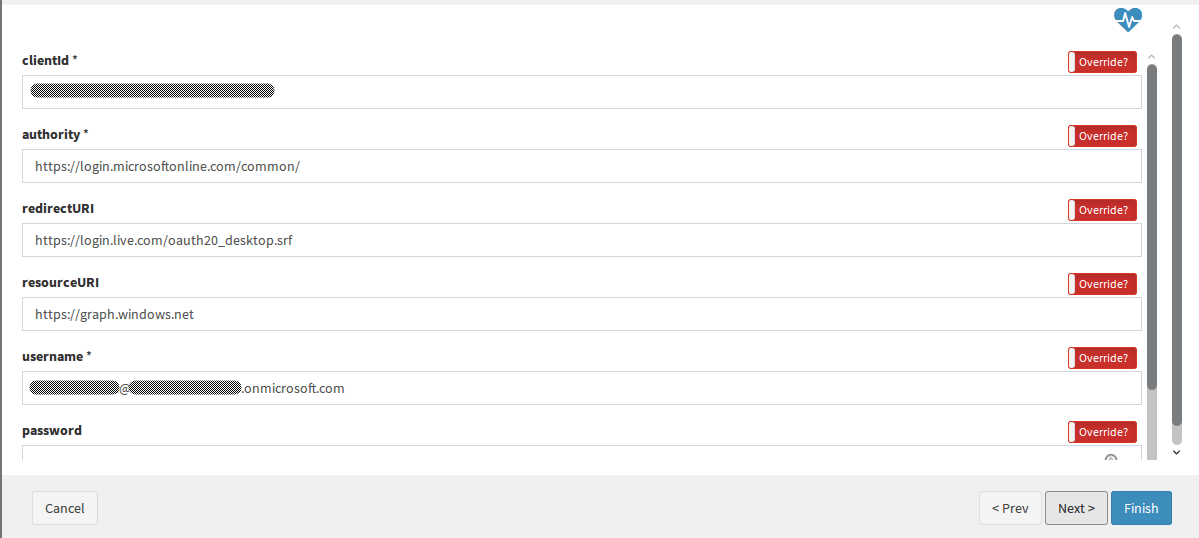
Click on "Next" button and enter the Azure service configuration by filling the required parameters (you can find more info about it on related ConnId Azure connector wiki page), here is an example:
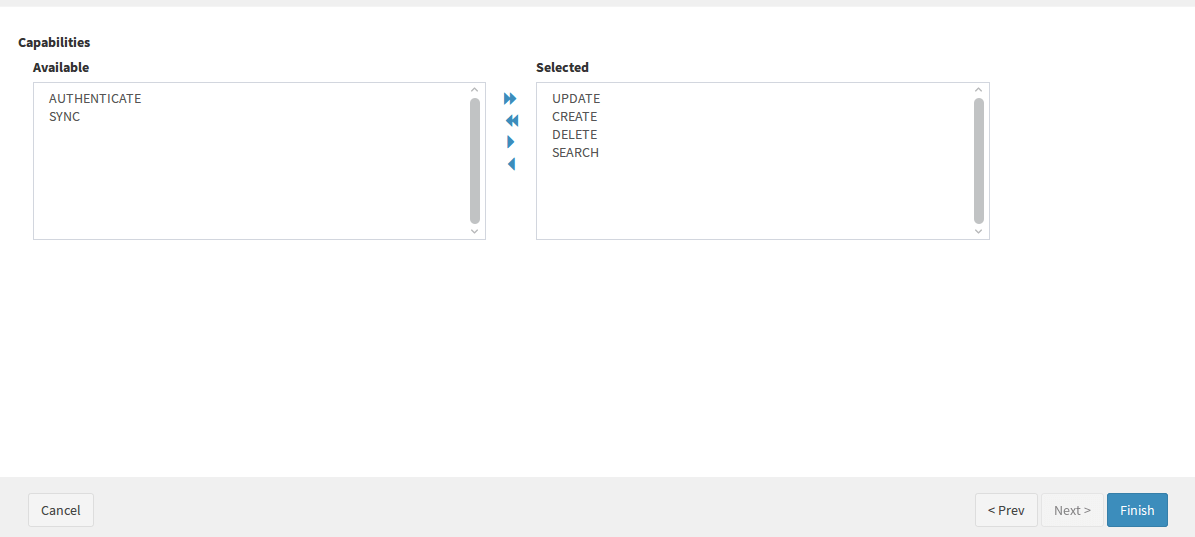
Click on "Next" button again, select connector Capabilities (AUTHENTICATE and SYNC are not supported as you can see here) and click on "Finish":
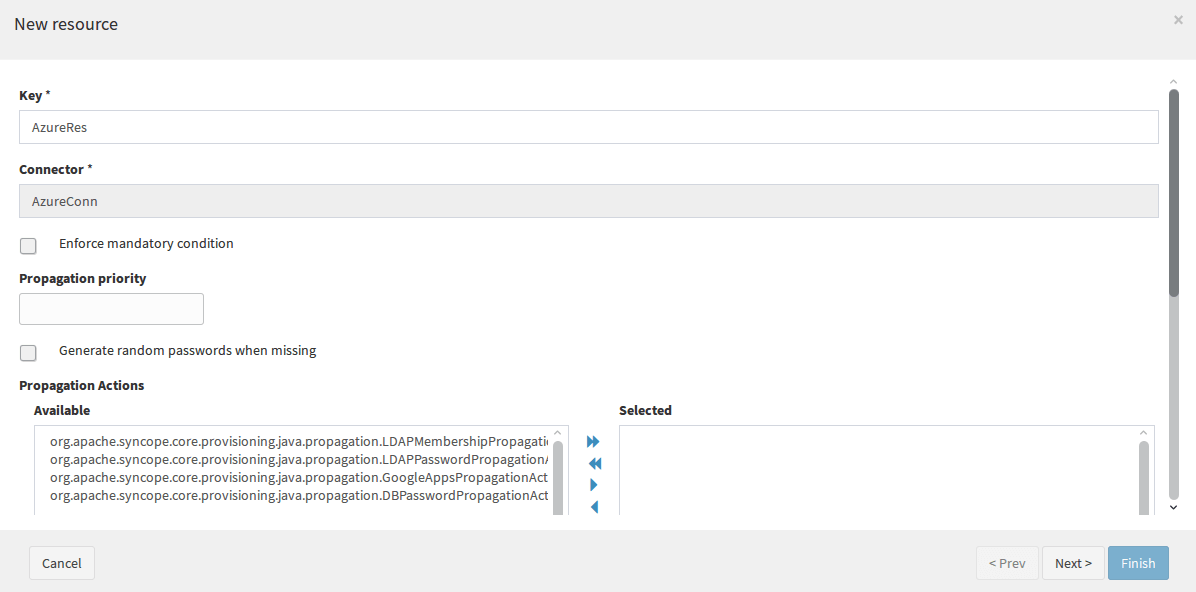
Now you are ready to create the Azure external resource.
Click on the just created connector and choose "Add new resource" from right menu:
Deal with "objectId" attribute, returned by Azure service after User / Group creations
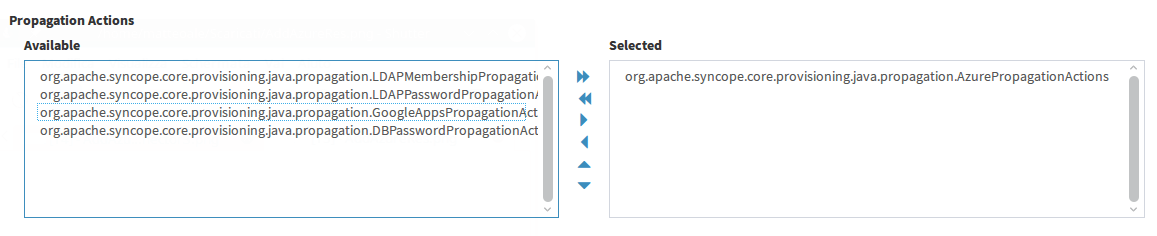
At this point, since we are using Syncope 2.0.8, we need to manually add the Azure PropagationActions to Syncope project (the related file already exists in Syncope project from version 2.0.9-SNAPSHOT by default) in order to let Syncope save the Users / Groups ID returned by Azure Service after creations.
You need to create the "org.apache.syncope.core.provisioning.java.propagation.AzurePropagationActions" file and link it to "AzureRes" resource.
So, just run the following commands to create and edit a new file with that name:
$ mkdir -p ./core/src/main/java/org/apache/syncope/core/provisioning/java/propagation/ && vim ./core/src/main/java/org/apache/syncope/core/provisioning/java/propagation/AzurePropagationActions.java
copy & paste the content of the file above (AzurePropagationActions.java).
Then stop Syncope, re-build and re-start it.
When it'll be ready, you'll be able to add the "AzurePropagationActions" to Azure resource.
So just click on resource node and select "Edit resource" from menu:
Add some required Plain Schemas
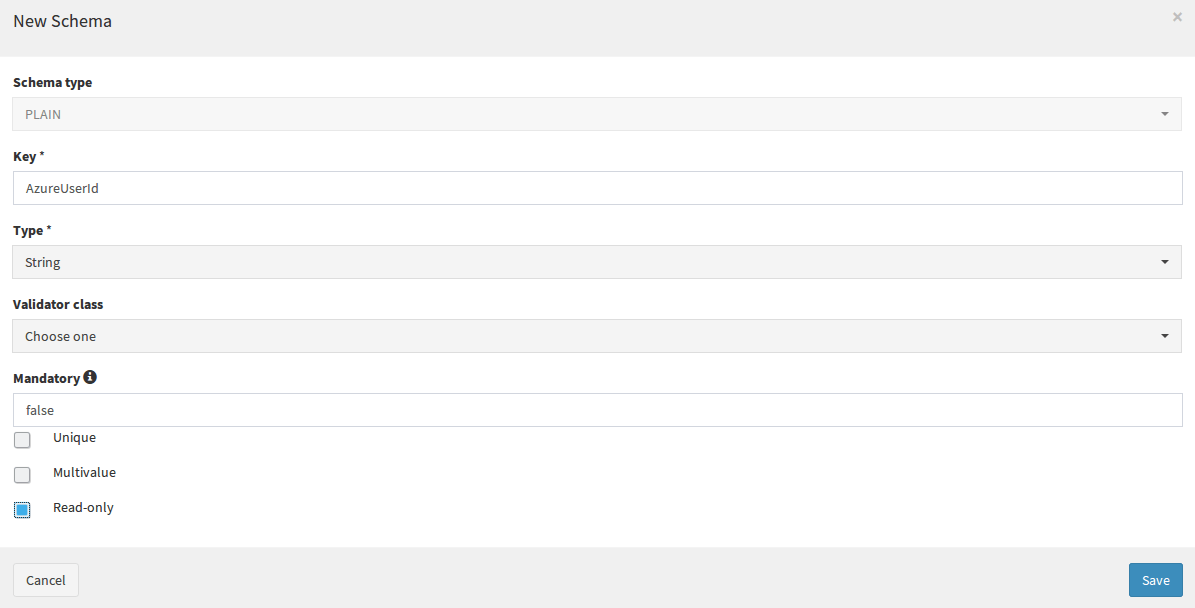
From the Admin Console, go to "Configuration" (left panel) -> "Types" -> "Schemas"; in the "PLAIN" accordion panel click on the "+" icon.
Create the "AzureUserId" schema:
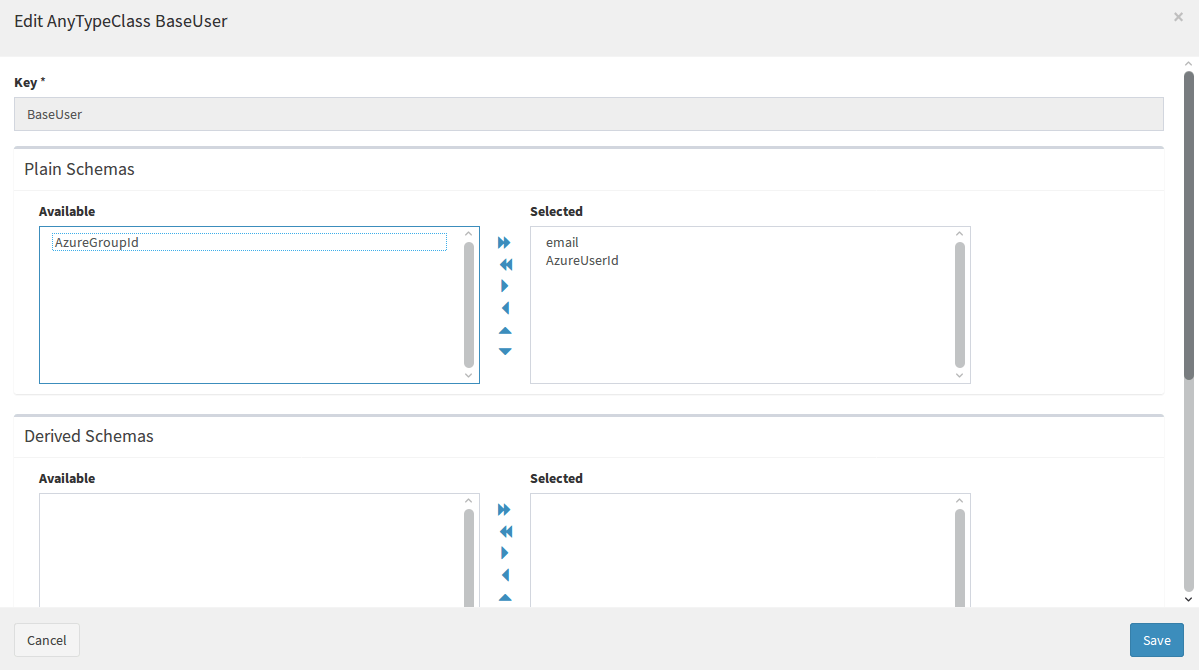
We must add it to "BaseUser" AnyTypeClass in order to have it available for "USER" AnyType.
To do that, select the "AnyTypeClasses" tab, click on "BaseUser" row and choose "edit" from right menu.
Add "AzureUserId" to "Selected" sub-panel, in "Plain Schemas" section:
Do the same for "AzureGroupId".
The only difference in this case is that the schema must be added to "BaseGroup" AnyTypeClass, it will be used for "GROUP" AnyType indeed.
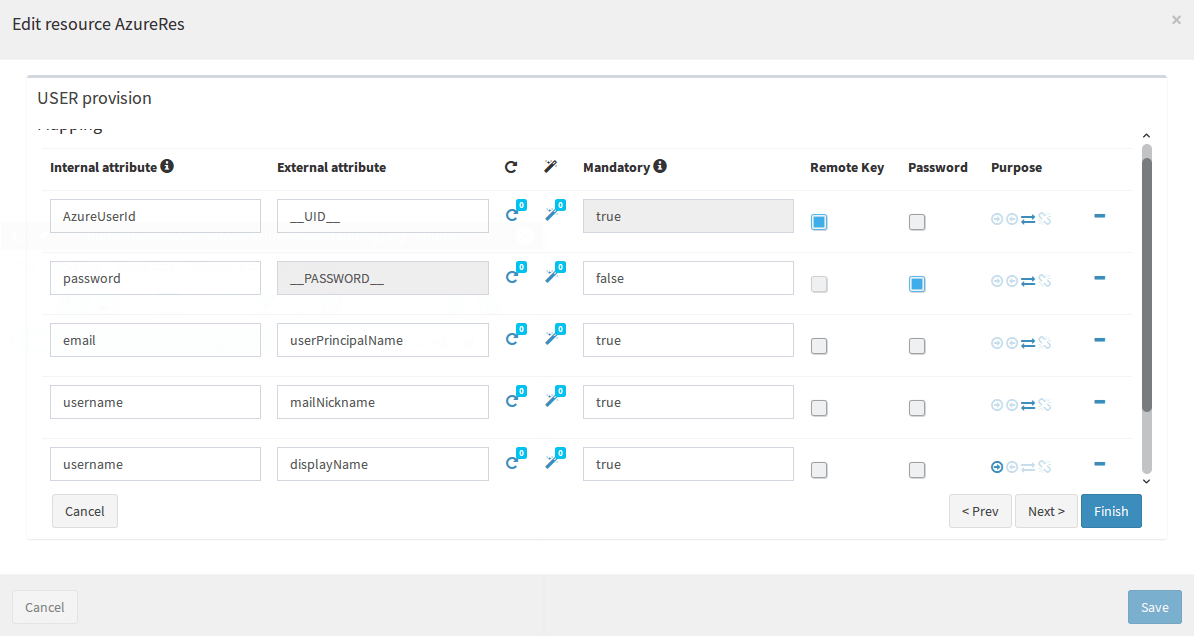
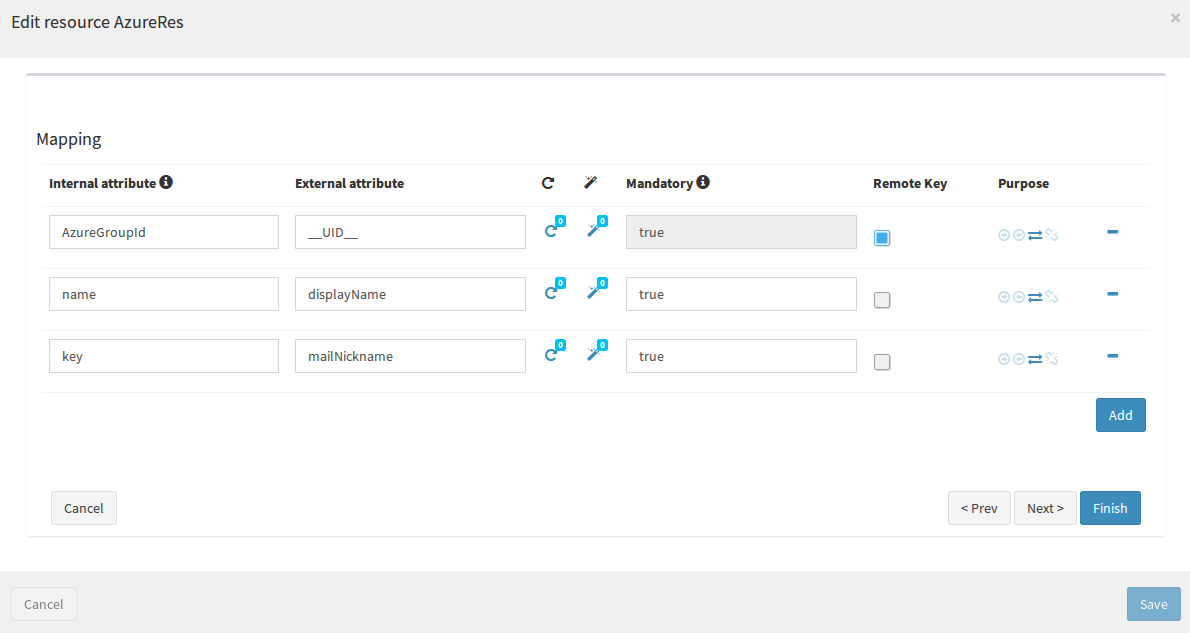
Add provision rules for "USER" and "GROUP"
Now we need to set some provision rules to map Azure AD attributes to Syncope attributes.
Click on the "AzureRes" node in "Topology" and choose "Edit provision rules" from right menu.
From the just opened modal window, click on "+" icon and select "USER", then click "Next" in the wizard until you'll get to "Mapping" step.
Now, you can choose a mapping configuration, e.g.
Configuration test
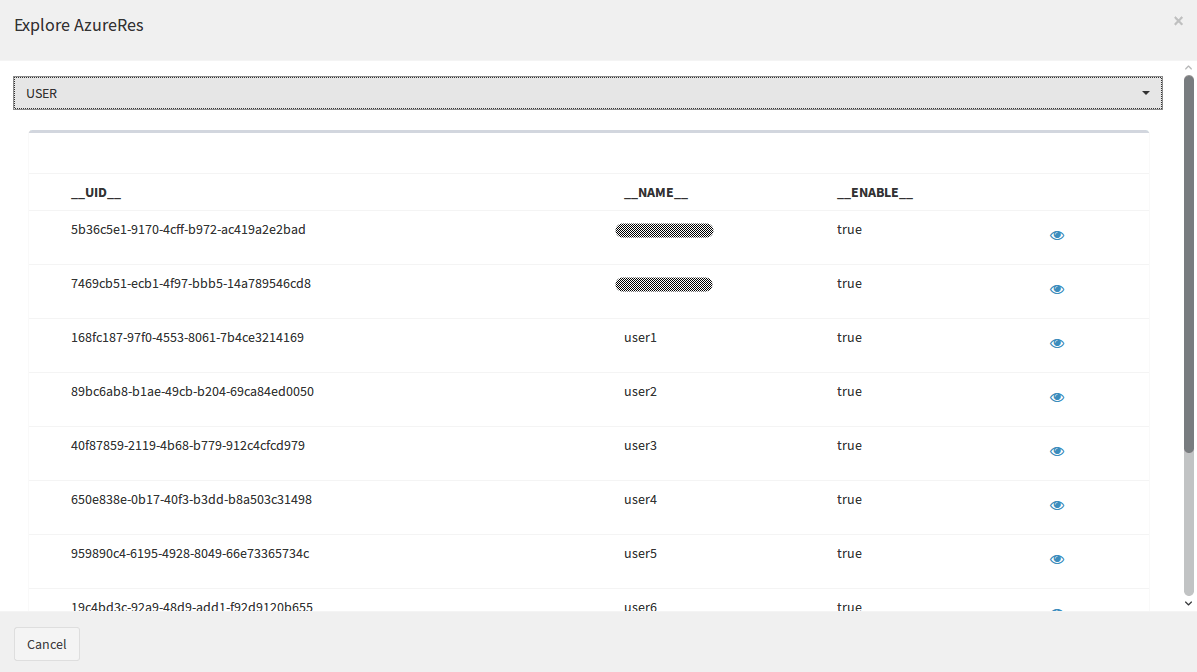
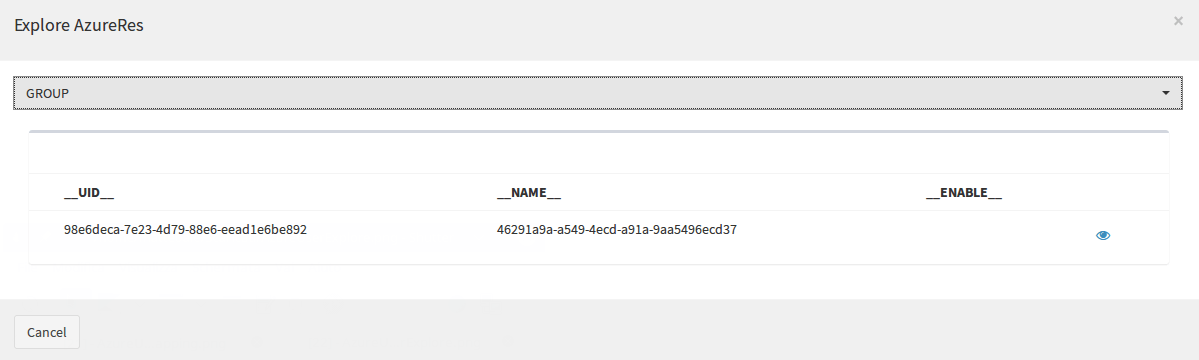
You can run a simple basic test by exploring the resource and make Syncope retrieve all Users / Groups you have in Azure AD.
Click on the "AzureRes" node from "Topology" and choose "Explore resource" from menu.
Select "USER" or "GROUP" from the dropdown on top of the modal window and you'll see some users / groups, in case you have any on the Azure AD.
Here you can see an example:
About Azure AD required attributes
Note that there are some required attributes that a User or Group must have before being created on Azure AD.
Here is the lists:
for Users:
- displayName (String)
- mailNickname (String)
- passwordProfile (PasswordProfile - It's simply handled as User password
- userPrincipalName (String) - If not specified, it will be in the form: "[mailNickname@AZURE_DOMAIN]"
for Groups:
- displayName (String)
- mailNickname (String)
Sample project
I have created a sample project according to this guide.
Assuming you have Git and Maven properly configured, run:
$ git clone https://github.com/Tirasa/syncopeWithAzure.git
$ cd syncopeWithAzure/
$ mvn -P all clean install && cd enduser && mvn -P embedded,all
Now you can point your browser to http://localhost:9080/syncope-console and start you tests.
 Good
Good
